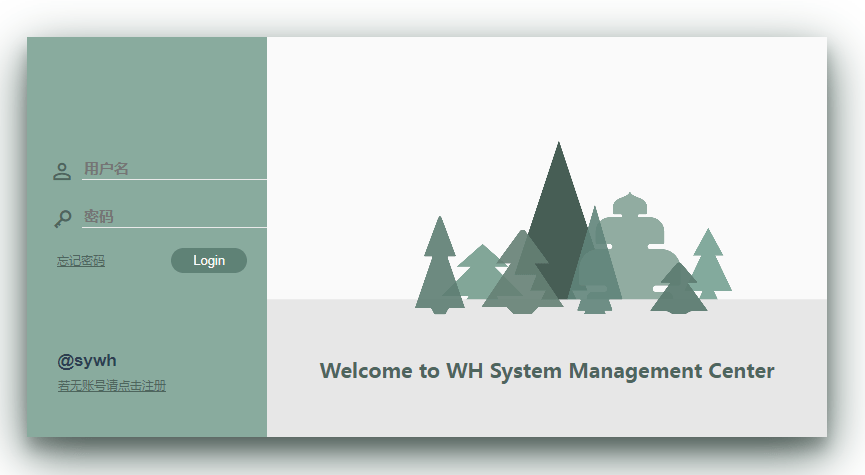
实验二、实现登录页面
【实验内容】
本实验主要是完成管理系统登录页面部分。
【实验目的】
1、学习如何分析页面布局;
2、了解在项目中如何使用iconfont图标库;
3、掌握修改input默认样式的方法;
4、掌握vue项目中页面间的跳转。
【实验步骤】
步骤1 分析页面目标元素布局;
步骤2 编写html部分代码完成页面布局;
步骤2 编写css代码美化样式;
步骤3 编写javascript代码完成登录逻辑。
步骤1 分析页面目标元素布局
如下图:

首先是一个大的登陆框,位于整个页面中心。大的登陆框中分为左右两部分,左边为登陆的功能,包含账号输入框、密码输入框、以及登陆按钮等,右边是一张背景图并带有网站信息或“欢迎”等字样。
步骤2 编写html部分代码完成页面布局
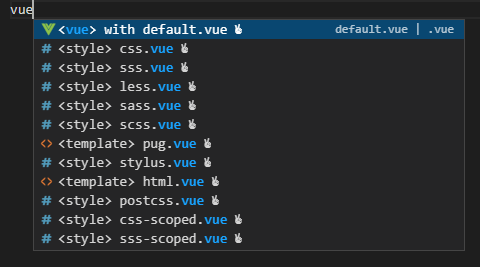
在view文件下新建一个Login.vue文件,输入vue生成默认模板如下图:
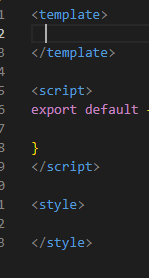
生成后的模板代码如下图:
在template中写入html部分代码如下:
<div class="container"> <div class="main"> <!-- 整个注册盒子 --> <div class="loginbox"> <!-- 左侧的注册盒子 --> <div class="loginbox-in"> <div class="userbox"> <span class="iconfont"></span> <input class="user" id="user" v-model="name" placeholder="用户名" /> </div> <br /> <div class="pwdbox"> <span class="iconfont"></span> <input class="pwd" id="password" type="password" v-model="pwd" placeholder="密码" /> </div> <br /> <div class="log-box"> <div class="log-box-text">忘记密码</div> <button type="primary" class="login_btn" @click="login"> Login </button> </div> <br /> <div class="warn">@sywh</div> <button type="primary" class="register_btn" @click="register"> 若无账号请点击注册 </button> </div> <!-- 右侧的注册盒子 --> <div class="background"> <div class="title">Welcome to WH System Management Center</div> </div> </div> </div> </div>
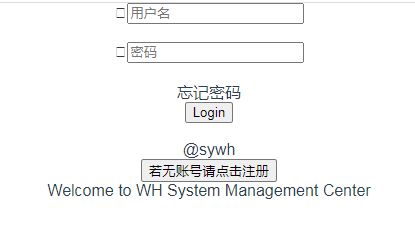
完成后的页面如下图:
步骤3 编写css代码美化样式
登陆卡片不管窗口如何调整大小,都始终位于页面中心,其中top:40%;left:50%; 是指div(我们的登陆卡片)左顶点在页面的位置,所以要使用tannsform 在X Y轴进行移动。
在style里加上scoped属性可以使css样式只能用于当前的Vue组件,可以使组件的样式不相互污染,如下图。

我们本次任务使用到了一些小图标,可以使用png以图片的形式加载,也可以使用iconfont(字体图标)的方式,加载在我们的页面中。想比于普通的图片,使用iconfont可以自由的变化大小并且也不会模糊,而且占用内存小,也可以任意改变颜色。

首先,我们需要在https://www.iconfont.cn/阿里矢量图表库中找到合适的图标。
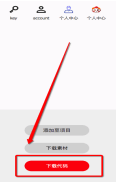
点击下载代码,我们可以看到下载的压缩包中主要有这几项:
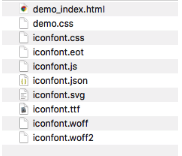
本次实验主要是unicode引用,所以我们真正会用到的文件只有这些:
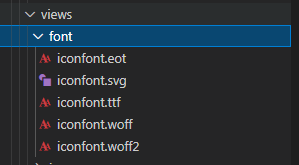
将拷贝项目下生成的@font-face(在iconfont.css中)到自己页面的css中,定义使用 iconfont 的样式代码如下:
@font-face {
  font-family: "iconfont";
  src: url("./font/iconfont.eot");
  src: url("./font/iconfont.eot?#iefix") format("embedded-opentype"),
    /* IE6-IE8 */ url("./font/iconfont.woff2") format("woff2"),
    url("./font/iconfont.woff") format("woff"),
    url("./font/iconfont.ttf") format("truetype"),
    /* chrome, firefox, opera, Safari, Android, iOS 4.2+ */
      url("./font/iconfont.svg#iconfont") format("svg");
}

.iconfont {
  font-family: "iconfont" !important;
  font-size: 20px;
  font-style: normal;
  -webkit-font-smoothing: antialiased;
  -moz-osx-font-smoothing: grayscale;
  height: 22px;
  color: #4e655d;
  margin-right: 10px;
  margin-top: 3px;
}

.icon-key:before {
  content: "e775";
}

.icon-account:before {
  content: "e817";
}
之后挑选相应图标并获取字体编码,应用于页面。
<span class="iconfont"><span>
修改input框默认样式与整体风格不符合,修改代码如下:
input {
  outline-style: none;
  border: 0;
  border-bottom: 1px solid #e9e9e9;
  background-color: transparent;
  height: 20px;
  font-family: sans-serif;
  font-size: 15px;
  color: #445b53;
  font-weight: bold;
}

/* input::-webkit-input-placeholder{
    color:#E9E9E9;
 } */
input:focus {
  border-bottom: 2px solid #445b53;
  background-color: transparent;
  transition: all 0.2s ease-in;
  font-family: sans-serif;
  font-size: 15px;
  color: #445b53;
  font-weight: bold;
}

input:hover {
  border-bottom: 2px solid #445b53;
  background-color: transparent;
  transition: all 0.2s ease-in;
  font-family: sans-serif;
  font-size: 15px;
  color: #445b53;
  font-weight: bold;
}

input:-webkit-autofill {
  /* 修改默认背景框的颜色 */
  box-shadow: 0 0 0px 1000px #89ab9e inset !important;
  /* 修改默认字体的颜色 */
  -webkit-text-fill-color: #445b53;
}

input:-webkit-autofill::first-line {
  /* 修改默认字体的大小 */
  font-size: 15px;
  /* 修改默认字体的样式 */
  font-weight: bold;
}
修改后的input框如下图:

完整的css代码如下:
<style scoped>
.loginbox {
  display: flex;
  position: absolute;
  width: 800px;
  height: 400px;
  top: 40%;
  left: 50%;
  transform: translate(-50%, -50%);
  box-shadow: 0 12px 16px 0 rgba(0, 0, 0, 0.24), 0 17px 50px 0 #4e655d;
}
.loginbox-in {
  background-color: #89ab9e;
  width: 240px;
}
.userbox {
  margin-top: 120px;
  height: 30px;
  width: 230px;
  display: flex;
  margin-left: 25px;
}
.pwdbox {
  height: 30px;
  width: 225px;
  display: flex;
  margin-left: 25px;
}

.background {
  width: 570px;
  background-image: url("./img/Christmas_Trees.png");
  background-size: cover;
  font-family: sans-serif;
}
.title {
  margin-top: 320px;
  font-weight: bold;
  font-size: 20px;
  color: #4e655d;
}
.title:hover {
  font-size: 21px;
  transition: all 0.4s ease-in-out;
  cursor: pointer;
}
.uesr-text {
  position: left;
}
input {
  outline-style: none;
  border: 0;
  border-bottom: 1px solid #e9e9e9;
  background-color: transparent;
  height: 20px;
  font-family: sans-serif;
  font-size: 15px;
  color: #445b53;
  font-weight: bold;
}
/* input::-webkit-input-placeholder{
    color:#E9E9E9;
 } */
input:focus {
  border-bottom: 2px solid #445b53;
  background-color: transparent;
  transition: all 0.2s ease-in;
  font-family: sans-serif;
  font-size: 15px;
  color: #445b53;
  font-weight: bold;
}
input:hover {
  border-bottom: 2px solid #445b53;
  background-color: transparent;
  transition: all 0.2s ease-in;
  font-family: sans-serif;
  font-size: 15px;
  color: #445b53;
  font-weight: bold;
}

input:-webkit-autofill {
  /* 修改默认背景框的颜色 */
  box-shadow: 0 0 0px 1000px #89ab9e inset !important;
  /* 修改默认字体的颜色 */
  -webkit-text-fill-color: #445b53;
}

input:-webkit-autofill::first-line {
  /* 修改默认字体的大小 */
  font-size: 15px;
  /* 修改默认字体的样式 */
  font-weight: bold;
}
.log-box {
  font-size: 12px;
  display: flex;
  justify-content: space-between;
  width: 190px;
  margin-left: 30px;
  color: #4e655d;
  margin-top: -5px;
  align-items: center;
}
.log-box-text {
  color: #4e655d;
  font-size: 12px;
  text-decoration: underline;
}
.login_btn {
  background-color: #5f8276; /* Green */
  border: none;
  color: #fafafa;
  padding: 5px 22px;
  text-align: center;
  text-decoration: none;
  font-size: 13px;
  border-radius: 20px;
  outline: none;
}
.login_btn:hover {
  box-shadow: 0 12px 16px 0 rgba(0, 0, 0, 0.24),
    0 17px 50px 0 rgba(0, 0, 0, 0.19);
  cursor: pointer;
  background-color: #0b5137;
  transition: all 0.2s ease-in;
}

.warn {
  margin-top: 60px;
  /* margin-right:120px; */
  margin-left: -120px;
  margin-bottom: 5px;
  font-weight: bold;
  font-size: 17px;
}

.register_btn {
  background-color: transparent; /* Green */
  border: none;
  text-decoration: none;
  font-size: 12px;
  /* border-radius: 20px;   */
  color: #4e655d;
  font-size: 12px;
  text-decoration: underline;
  display: flex;
  margin-left: 25px;
  outline: none;
}
.register_btn:hover {
  font-weight: bold;
  cursor: pointer;
}
@font-face {
  font-family: "iconfont";
  src: url("./font/iconfont.eot");
  src: url("./font/iconfont.eot?#iefix") format("embedded-opentype"),
    /* IE6-IE8 */ url("./font/iconfont.woff2") format("woff2"),
    url("./font/iconfont.woff") format("woff"),
    url("./font/iconfont.ttf") format("truetype"),
    /* chrome, firefox, opera, Safari, Android, iOS 4.2+ */
      url("./font/iconfont.svg#iconfont") format("svg");
}

.iconfont {
  font-family: "iconfont" !important;
  font-size: 20px;
  font-style: normal;
  -webkit-font-smoothing: antialiased;
  -moz-osx-font-smoothing: grayscale;
  height: 22px;
  color: #4e655d;
  margin-right: 10px;
  margin-top: 3px;
}

.icon-key:before {
  content: "e775";
}

.icon-account:before {
  content: "e817";
}
style>
步骤4 编写javascript代码完成登录逻辑
使用v-model监听获取到输入框中值。如果用户名和密码都正确,那么可以跳转。跳转的方式如下:
          this.$router.push({
            path: '"Homepage', //主页路由
          });
在view文件夹新建Homepage.vue和Register.vue在router文件夹下的index.js文件下添加如下代码注册路由:
import Vue from "vue";
import VueRouter from "vue-router";
import Login from "../views/Login.vue";

Vue.use(VueRouter);

const routes = [
  {
    path: "/",
    name: "Login",
    component: Login,
  },
];

const router = new VueRouter({
  mode: "history",
  base: process.env.BASE_URL,
  routes,
});

export default router;
注册路由完成之后可以进行页面的调跳转。Script部分完整代码如下:
<script>
export default {
  name: "Login",
  data: function () {
    return {
      name: "",  //输入账户
      pwd: "",  //输入密码
      user_list: [  //可以登录的账号密码
        {
          id: "1",
          username: "admin",
          password: "123",
        },
      ],
    };
  },
  methods: {
    register() {
      this.$router.push("Register");
    },

    login() {
      var flag = 0;
        this.user_list.forEach((item) => {
          if (item.username == this.name) {
            if (item.password == this.pwd) {
              flag = 1; //用户存在,并且密码正确
            }
          }
        });
        if (flag == 1) {
          //可以跳转到主页
          // this.$router.push("Homepage");
          this.$router.push({
            path: 'Homepage',
          });
        } else {
          alert("用户名或密码错误,请重新输入");
        }

    },
  },
};
</script>
完成后的登录页面如下图:
